Ubuntu 20.04 / Debian 10 – An Anonymous and Secured Seedbox – (Part 3) Configuration and issues
6 – Configuration
These configuration steps are not exhaustive, you can play with the labels, categories, or plugins but these are required for your applications to communicate with each other and have at least minimum security.
6.1 – Deluge
-
Access Deluge:
- If you have installed Deluge on your own machine, you can access it to http://localhost:8112
- If you have Deluge installed on a machine on your local network, you can access it to http://192.168.X.X:8112 where X.X has to be replaced with your machine’s local IP
- If you have installed Deluge on a kimsufi or dedicated server, you can access it to your previously configured domain or via the public IP of your server http://X.X.X.X:8112.
-
Enter the default deluge password:
12 1
1Enter deluge
2Click on Login
-
Select the Deluge process that the Deluge WebUI interface needs to connect to:
12 1
1Select the host
2Click Connect
-
In Preferences → Interface, change the default password:
12345 1
1Enter the default deluge password
2Enter your new password
3Confirm your new password
4Click on Apply
5Click on OK
-
In Preferences → Downloads:
Choice 1: if you have chosen AirVPN ou PIA
Fill in the path /data/torrents.
Whatever the download folder you have previously provided in your
123 1
1Fill in /data/torrents
2Click on Apply
3Click on Ok
Choice 2: without VPN
Fill in the path /downloads/torrents.
Whatever the download folder you have previously provided in your
123 1
1Fill in /downloads/torrents
2Click on Apply
3Click on Ok
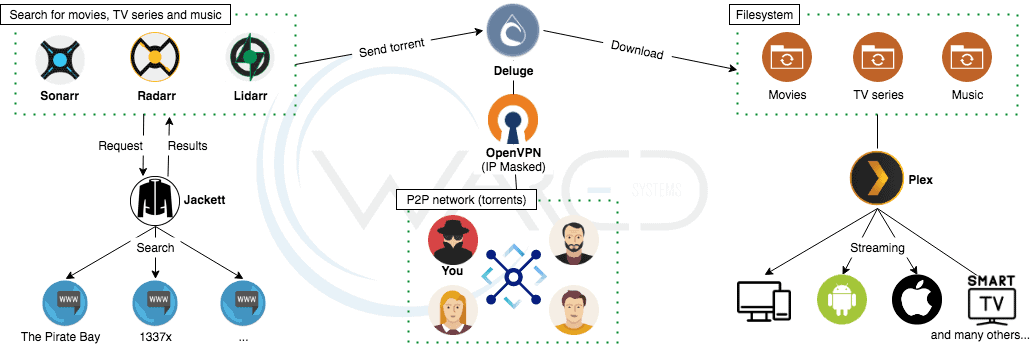
- This allows you to categorize your downloads and move them to a specific folder depending on the category. For example, you download a music album with Lidarr, the music label will be automatically applied to your download and it will be moved to a directory dedicated to your music albums. This allows you to have a minimum storage footprint within your directories and will be very useful later, especially in Plex.
In Preferences → Plugins, install the Label plugin:
123 1
1Select the Label plugin
2Click on Apply
3Click on Ok
-
In the left column of the main screen, a new Labels tab has been added. Right-click on it and add the following labels:
- movies
- tv
- music

-
Once the three labels have been added, expand the Labels tab, right-click on the movies label and edit the label options:

- In the Folders tab:
Choice 2: without VPN
Fill in the path /downloads/movies:
123 1
1Check Apply folder settings: and Move completed to:
2Fill in /downloads/movies
3Click on Ok
Repeat the operation for the tv label by setting the path /downloads/tv and for the music label by setting the path /downloads/music.

6.2 – Jackett
-
Access Jackett:
- If you have installed Jackett on your own machine, you can access it to http://localhost:9117
- If you have Jackett installed on a machine on your local network, you can access it to http://192.168.X.X:9117 where X.X has to be replaced with your machine’s local IP
- If you have installed Jackett on a kimsufi or dedicated server, you can access it to your previously configured domain or via the public IP of your server http://X.X.X.X:9117.
-
At the bottom of the page, add a password to restrict access to Jackett:
12 1
1Enter a password
2Click on Set Password
- Add your indexers (trackers) by clicking on the button.
6.3 – Sonarr
-
Access Sonarr:
- If you have installed Sonarr on your own machine, you can access it to http://localhost:8989
- If you have Sonarr installed on a machine on your local network, you can access it to http://192.168.X.X:8989 where X.X has to be replaced with your machine’s local IP
- If you have installed Sonarr on a kimsufi or dedicated server, you can access it to your previously configured domain or via the public IP of your server http://X.X.X.X:8989.
-
Enable authentication in Settings → General → Security:
123 1
1Select Forms (Login Page)
2Enter a username
3Enter a password
-
Add all your indexers in Settings → Indexers by choosing a Torznab (Custom).
The URL and API key are to be retrieved from Jackett. Copy the URL of the desired tracker by clicking on button as well as the API key at the top right of Jackett.
The categories can also be found in Jackett. Click on button in front of the tracker to obtain the exhaustive list of categories. For Sonarr, you obviously have to collect the IDs of the categories linked to the TV series (TV shows, TV or TV/Anime for example). Please note that the categories differ depending on the tracker.
123456 1
1Specify a name for your indexer (purely indicative)
2Enter the URL provided by Jackett for your tracker
3Enter Jackett’s API key
4The categories specific for your tracker can be found in Jackett
5Test your configuration
6If the test passes, save your configuration
-
Add deluge in Settings → Download Client.
Be careful while filling the tv category. As a reminder, for every download added by Sonarr in Deluge, the tv label will be applied. Once the download is complete, the file will be moved to the directory configured in Deluge.
1234567 1
1Specify a name for your client (purely indicative)
2Enter the URL of your Deluge
3Enter the port of Deluge
4Enter your deluge password
5Enter the tv category
6Test your configuration
7If the test passes, save your configuration
- Finally, if you wish, you can create a profile with the quality and language of your choice in Settings → Profiles
- Click on at the top right to save your new configuration.
- In System, restart Sonarr to take into account the new configuration by clicking on the icon at the top right.
-
To add a series, you must go to the Series menu, perform a search and add the series, while ensuring to specify the path: /data/tv:
12 1
1Specify the path /data/tv
2Validate
6.4 – Radarr
-
Access Radarr:
- If you have installed Radarr on your own machine, you can access it to http://localhost:7878
- If you have Radarr installed on a machine on your local network, you can access it to http://192.168.X.X:7878 where X.X has to be replaced with your machine’s local IP
- If you have installed Radarr on a kimsufi or dedicated server, you can access it to your previously configured domain or via the public IP of your server http://X.X.X.X:7878.
-
Repeat the Sonarr procedure.
Take note, in step 3, you must retrieve the IDs of the categories linked to the films (for example the ID of the Movies or Film/Video category).
In step 4, the category to fill in is movies.
In step 8, the path to specify is /data/movies.
6.5 – Lidarr
-
Access Lidarr:
- If you have installed Lidarr on your own machine, you can access it to http://localhost:8686
- If you have Lidarr installed on a machine on your local network, you can access it to http://192.168.X.X:8686 where X.X has to be replaced with your machine’s local IP
- If you have installed Lidarr on a kimsufi or dedicated server, you can access it to your previously configured domain or via the public IP of your server http://X.X.X.X:8686.
-
Repeat the Sonarr procedure.
Take note, in step 3, you must retrieve the IDs of the categories linked to the audio files (for example the ID of the Audio category).
In step 4, the category to fill in is music.
In step 8, the path to specify is /data/music.
6.6 – Plex
-
Access Plex:
- If you have installed Plex on your own machine, you can access it to http://localhost:32400/web
- If you have Plex installed on a machine on your local network, you can access it to http://192.168.X.X:32400/web where X.X has to be replaced with your machine’s local IP
- If you have installed Plex on a kimsufi or dedicated server, you can access it to your previously configured domain or via the public IP of your server http://X.X.X.X:32400/web.
- Visit the following URL: http://localhost:32400/web and log in or sign up.
-
Specify a media server name and check the Allow me to access my media outside my home checkbox:

-
Add a librairy Music, choose the desired language and specify the path /data/music:

- Repeat the operation with a TV Series library by specifying the path /data/tv and with a Movies library by specifying the path /data/movies.
-
Once the 3 libraries have been added, click Next. The configuration is now complete.

7 – Tips and issues
In Deluge, the download starts and then stops after a few seconds…
You most certainly have a permissions problem. The media user is unable to write to the /data/torrents directory.
I cannot access Deluge outside my local network.
You certainly have the Deluge image with VPN and you don’t have a domain name. This is normal, you will not be able to access Deluge via the public IP of your server, it is a restriction of the image to avoid an IP leak when you download or share a torrent. Either you realize an SSH tunnel but it will be quickly binding to use, or you subscribe to a free domain name (Freenom for example) and you set up Nginx or Traefik (part 2).
I have a .torrent file, so I don’t go through Radarr, Sonarr or Lidarr, how can I apply a label to it in Deluge?
Add your torrent in Deluge and right click on it to open the context menu. You will be able to apply a label to it.
Sonarr, Radarr or Lidarr does not return any results. However, my tracker returns results.
Perform a search in Jackett via the icon and if Jackett returns results, then the problem comes from the categories entered in Sonarr, Radarr or Lidarr in the Indexers section.
Plex can’t find my server, what can I do?
Two possibilities:
- Your association code PLEX_CLAIM in your docker-compose.yml file expired. Repeat the procedure in part 2.
-
You can add the server by performing an SSH tunnel (replace user with your user and IP_SERVER with the IP of your dedicated server):
ssh user@IP_SERVER -L 32400:localhost:32400
Visit the following URL: http://localhost:32400/web, your server will be found. You can then reconnect without problem via your domain or public IP.
After a download, I ended up with two identical files. Deluge moved the file into /data/tv and Sonarr copied the file into /data/tv/Chernobyl/Season 1/:
data
├── movies
├── music
├── torrents
└── tv
    ├── Chernobyl.S01E01.720p.mkv
    └── Chernobyl
        └── Season 1
            └── Chernobyl.S01E01.720p.mkv
Sonarr does not copy the file but creates a physical link (or hardlink). A physical link associates two or more files with the same space on the disk so in our case, a download does not occupy two places on the disk. These files share the same disk space.
The download manager has several functions. It lets you share your torrent files in Deluge, rename and organize your series in seasons, and lets you have a separate library for it on Plex.

Ubuntu Server 20.04Docker 19.03.8
Docker Compose 1.25.5
Nginx 1.17.10
Deluge 2.0.4
Jackett 0.16.105.0
Sonarr 2.0.0.5344
Radarr 0.2.0.1480
Lidarr 0.7.1.1381


Leave a Reply
Want to join the discussion?Feel free to contribute!