Ubuntu 20.04 – An Anonymous And Secure Seedbox With Deluge, Jackett, Sonarr, Radarr, Lidarr, Nginx, Docker And SSL/TLS
This article describes the procedure for installing an automated, anonymous, and secure seedbox on Ubuntu 20.04 using Docker and OpenVPN.
-
Who is this tutorial for?
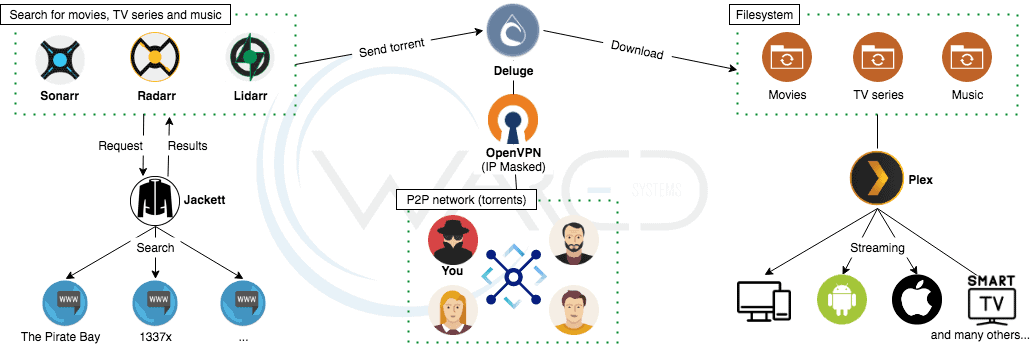
If you want to automate downloading movies, TV shows, and music albums as soon as they are available and then stream them to your computer, smartphone or Smart TV, then this article is for you! Security-wise, you will be completely anonymous and protected! This procedure works for local, VM, or dedicated server installations (kimsufi, dedibox, etc.). You don’t have to have a domain name to access it externally. However, if you have one, we will see how to set up an Nginx or Traefik HTTP server and encrypt your exchanges with the SSL / TLS protocol.
-
Why Docker and OpenVPN ?
Your seedbox will be deployed in minutes! Docker allows you to install and execute all the tools you need with a few commands. Each tool is isolated and has its own Docker container. Each container contains all the dependencies (libraries, daemons, configurations, etc.) necessary to run it without interfering with other tools or services installed on your server. Finally, tool updates are simplified and can be fully automated (we’ll see). Docker images are versioned, which makes it easy to redeploy a previous version.
Using OpenVPN is not mandatory in this tutorial but highly recommended. You should know that your true IP is revealed when you use the P2P network. It is therefore visible to certain authorities (without citing them…) and to other users on the network.
Using OpenVPN linked to a VPN helps you to hide your IP. The two VPNs featured in the rest of the tutorial keep no record of your connections (no log retention) and allow the use of a P2P network. Also, if for some reason the VPN fails, your downloads would be automatically interrupted.
-
The tools used
To download your movies, TV shows, or audio files, the .torrent files will be added to the Deluge tool. Deluge is a free cross-platform BitTorrent client based on libtorrent. It is known for its stability, speed, and lightweight size and has a clear and intuitive interface. It also proves to be very flexible thanks to the possibility of adding numerous plugins to it.

Sonarr lets you search for the .torrent files of your favorite series and automate the download. You add a series to the interface by specifying the desired quality and language. Sonarr will search for it via the configured indexers. It will then automatically add the series to Deluge. Among Sonarr’s many features is that it has daily tasks that automatically add a freshly released episode. The interface also has a calendar that lists the release dates of future episodes.

Radarr and Lidarr work similarly to Sonarr but are for movies and audio files respectively.
However, Sonarr and Radarr offer very few indexers (or trackers) today. Jackett helps fill this gap and supports more than a hundred trackers. Many trackers (The Pirate Bay, YGGtorrent) are supported, as well as private and semi-private trackers.
Jackett works like a proxy server. When you perform a search via Sonarr or Radarr, it transforms and transmits the request to the tracker. It then analyzes the response and returns the results to the transmitting application. Jackett supports RSS feeds as well.
Finally, Plex is a solution that centralizes all your media (films, series, music, photos) and broadcasts them from any device with an internet connection.
Plex, which is based on XBMC, has a two-part architecture. The first part is the server application. It contains all of your media, facilitates the organization of your collection (by themes, seasons, albums, etc.), and completes the information about each media, by searching the main online databases (TMDb, MoviePosterDB, etc.). The app converts your media on the fly to a format compatible with the player.
The second part is the player application (your browser, the Plex app on your mobile, SMART TV, etc.) that allows you to view your media. The quality of the stream is adjusted for the speed of your network. It also has numerous features such as synchronization, offline playback, and automatic subtitle recovery.


1 – Requirements
-
You must have Ubuntu 20.04.
-
Your user must have access to sudo.
-
The curl et software-properties-common packages must be installed on your system. If you’re not sure it’s installed, type in the following command:
sudo apt-get install -y curl software-properties-common
2 – Docker & Docker Compose installation
-
Update the list of files available in your APT repositories:
sudo apt-get update
-
Install Docker:
sudo apt-get install -y docker.io
-
Make sure Docker is properly installed with the command:
docker -v
The command should return the installed version of Docker.
-
Download Docker Compose with the following command (changing the version if necessary with the latest release of Docker’s official repository:
sudo curl -L https://github.com/docker/compose/releases/download/1.25.5/docker-compose-`uname -s`-`uname -m` -o /usr/local/bin/docker-compose
-
Add execution rights to Docker Compose binary:
sudo chmod +x /usr/local/bin/docker-compose
-
Check Docker Compose installation with the command:
docker-compose -v
If the installation has been done correctly, this command should return the Docker Compose version.
3 – Directory tree structure and files permissions
It is recommended, for security reasons, to create a user dedicated to managing Docker volumes (Deluge, Jackett, Sonarr, Radarr, Lidarr and Plex) instead of launching them under your superuser.
-
Create a media user:
sudo adduser media
-
Add it to the docker group:
sudo adduser media docker
The tree structure used with the filesystem will be as follows:
data
├── movies
├── music
├── torrents
└── tv
A file downloaded via Deluge will remain in the /data/torrents folder while it is being downloaded. Once completed, it will be automatically moved by Deluge to the /data/movies, /data/tv or /data/music directory depending on whether the download was added by Radarr, Sonarr or Lidarr.
-
Create the directories dedicated to downloads:
sudo mkdir -p /data/torrents /data/movies /data/music /data/tv
-
Assign these directories to the media user to avoid permission issues in the future:
sudo chown media:media /data/torrents /data/movies /data/music /data/tv
4 – Creating Docker Volumes
4.1 – Deluge
There are three options for Docker volumes. The first two, which are highly recommended, are to use a Docker image composed of Deluge and OpenVPN. This image allows you to anonymously and securely download your torrents via a VPN. It also has iptables rules that ensure that your downloads will be interrupted and your real IP will not be revealed if, for some reason, the VPN fails.
This Docker image works with AirVPN and Private Internet Access (PIA). The PIA configuration is faster to set up, but AirVPN fares are unbeatable.
Whatever your choice is between these two providers, you will have a fast, stable, highly encrypted, confidential (no history), and P2P-friendly VPN. After almost 10 years of using these VPNs, I can guarantee that they leave no trace…
The last option is to get rid of the VPN and use an image that contains only Deluge. Just know that your IP will be visible to other users of the P2P network and that your downloads will not be encrypted or anonymous…
Choice 1 : avec AirVPN
-
Log in under the media user:
su media
-
Move to the home directory of this user:
cd
-
Create the /home/media/.env file and change the values according to your configuration:
PUID=1001
PGID=1001
PATH_MEDIA=/data
LAN_NETWORK=192.168.1.0/24
-
PUID and GUID : these two variables represent your media user’s identifier and group, respectively. These values may differ from system to system. Type in the following command to get your media user’s PUID and GUID:
id media
uid=1001(media) gid=1001(media) groups=1001(media),999(docker)
In this example, uid is equivalent to PUID and gid equivalent to PGID.
- PATH_MEDIA : this is the absolute path of the parent folder of the /data/torrents, /data/movies, /data/music, and /data/tv folders where your media would be stored. If you choose another path, make sure the media user has the read and write permissions to the specified directory.
-
LAN_NETWORK : IP address (CIDR notation) of your local network.
If you are on a kimsufi, dedicated server, or VPS, leave the default as 192.168.1.0.
If you are installing on your machine or a machine in your local network, this value must be entered correctly. Type in the command
ifconfigand identify your local network (usually eth0) :eth0: flags=4163<UP,BROADCAST,RUNNING,MULTICAST> mtu 1500 inet 192.168.1.10 netmask 255.255.255.0 broadcast 192.168.1.255 ether 68:05:ca:0b:fe:25 txqueuelen 0 (Ethernet) RX packets 28203743 bytes 36171326044 (33.6 GiB) RX errors 0 dropped 19925 overruns 0 frame 0 TX packets 26710466 bytes 165269242671 (153.9 GiB) TX errors 0 dropped 0 overruns 0 carrier 0 collisions 0
The IP address here is 192.168.1.10 (inet) and the subnet mask is 255.255.255.0 (netmask). To calculate the IP of the local network, use the tool CIDR Calculator and enter your IP in the IP Address field and the subnet mask in the CIDR Netmask. You will obtain the good value to set in the Net: CIDR Notation field.
-
-
Create the file /home/media/docker-compose.yml with the following content (do not change anything):
version: '3.7' services: deluge: image: binhex/arch-delugevpn:latest container_name: deluge restart: unless-stopped cap_add: - NET_ADMIN ports: - 8112:8112 - 8118:8118 - 58846:58846 - 58946:58946 environment: - PUID=${PUID} - PGID=${PGID} - VPN_ENABLED=yes - VPN_PROV=airvpn - ENABLE_PRIVOXY=yes - LAN_NETWORK=${LAN_NETWORK} - NAME_SERVERS=209.222.18.222,37.235.1.174,8.8.8.8,209.222.18.218,37.235.1.177,8.8.4.4 - UMASK=000 - DEBUG=false volumes: - /home/media/deluge/config:/config - /etc/localtime:/etc/localtime:ro - ${PATH_MEDIA}:/data -
Download the Deluge image and start it to force the creation of the directory dedicated to configuration files with the following command:
docker-compose up -d
-
Stop the deluge container:
docker-compose stop deluge
-
Generate an OpenVPN configuration file on AirVPN. First, log on to your AirVPN account. Go to Client Area – Config Generator.
Choose the Linux system, then check the UDP protocol. Choose the server you want to connect to (choose a country rather than a particular server) and finally download the configuration file by clicking the Generate button. -
Copy the .ovpn configuration file previously obtained to the /home/media/deluge/config/openvpn directory.
-
The .ovpn file must belong to the user and the media group and must have 755 permissions. Return to your superuser and change the owner and permissions of the .ovpn file:
exit
sudo chown media:media /home/media/deluge/config/openvpn/*
sudo chmod 755 /home/media/deluge/config/openvpn/*
-
Log in again under the media user and move to the home directory of this user:
su media
cd
-
Start the deluge container:
docker-compose start deluge
Choice 2 : avec PIA
-
Log in under the media user:
su media
-
Move to the home directory of this user:
cd
-
Create the /home/media/.env file and change the values according to your configuration:
PUID=1001
PGID=1001
PATH_MEDIA=/data
VPN_USER=pia_user
VPN_PASS=pia_password
LAN_NETWORK=192.168.1.0/24
-
PUID and GUID : these two variables represent your media user’s identifier and group, respectively. These values may differ from system to system. Type in the following command to get your media user’s PUID and GUID:
id media
uid=1001(media) gid=1001(media) groups=1001(media),999(docker)
In this example, uid is equivalent to PUID and gid equivalent to PGID.
- PATH_MEDIA : this is the absolute path of the parent folder of the /data/torrents, /data/movies, /data/music, and /data/tv folders where your media would be stored. If you choose another path, make sure the media user has the read and write permissions to the specified directory.
- VPN_USER=pia_user et VPN_PASS=pia_password : username and password of your PIA account.
-
LAN_NETWORK : IP address (CIDR notation) of your local network.
If you are on a kimsufi, dedicated server, or VPS, leave the default as 192.168.1.0.
If you are installing on your machine or a machine in your local network, this value must be entered correctly. Type in the command
ifconfigand identify your local network (usually eth0) :eth0: flags=4163<UP,BROADCAST,RUNNING,MULTICAST> mtu 1500 inet 192.168.1.10 netmask 255.255.255.0 broadcast 192.168.1.255 ether 68:05:ca:0b:fe:25 txqueuelen 0 (Ethernet) RX packets 28203743 bytes 36171326044 (33.6 GiB) RX errors 0 dropped 19925 overruns 0 frame 0 TX packets 26710466 bytes 165269242671 (153.9 GiB) TX errors 0 dropped 0 overruns 0 carrier 0 collisions 0
The IP address here is 192.168.1.10 (inet) and the subnet mask is 255.255.255.0 (netmask). To calculate the IP of the local network, use the tool CIDR Calculator and enter your IP in the IP Address field and the subnet mask in the CIDR Netmask. You will obtain the good value to set in the Net: CIDR Notation field.
-
-
Create the /home/media/docker-compose.yml file with the following content (do not change anything):
version: '3.7' services: deluge: image: binhex/arch-delugevpn:latest container_name: deluge restart: unless-stopped cap_add: - NET_ADMIN ports: - 8112:8112 - 8118:8118 - 58846:58846 - 58946:58946 environment: - PUID=${PUID} - PGID=${PGID} - VPN_ENABLED=yes - VPN_USER=${VPN_USER} - VPN_PASS=${VPN_PASS} - VPN_PROV=pia - STRICT_PORT_FORWARD=yes - ENABLE_PRIVOXY=yes - LAN_NETWORK=${LAN_NETWORK} - NAME_SERVERS=209.222.18.222,37.235.1.174,8.8.8.8,209.222.18.218,37.235.1.177,8.8.4.4 - UMASK=000 - DEBUG=false volumes: - /home/media/deluge/config:/config - /etc/localtime:/etc/localtime:ro - ${PATH_MEDIA}:/data -
Download the Deluge image and start it to force the creation of the directory dedicated to configuration files with the following command:
docker-compose up -d
-
Stop the deluge container:
docker-compose stop deluge
-
Download the PIA certificates and the configuration files at https://www.privateinternetaccess.com/openvpn/openvpn.zip.
-
Unzip and copy the crl.rsa.2048.pem, ca.rsa.2048.crt certificates and the OpenVPN .ovpn configuration file of your choice to the /home/media/deluge/config/openvpn directory. Make sure you only have these 3 files in the directory. Only one OpenVPN .ovpn configuration file must be present.
-
These files must belong to the user and the media group and must have 755 permissions. Return to your superuser and change the owner and permissions of the .ovpn file:
exit
sudo chown media:media /home/media/deluge/config/openvpn/*
sudo chmod 755 /home/media/deluge/config/openvpn/*
-
Log in again under media user and move to the home directory of this user:
su media
cd
-
Start the deluge container:
docker-compose start deluge
Choice 3 : without VPN (not recommanded)
-
Log in under the media user:
su media
-
Move to the home directory of this user:
cd
-
Create the /home/media/.env file and change the values according to your configuration:
PUID=1001
PGID=1001
PATH_MEDIA=/data
-
PUID and GUID : these two variables represent your media user’s identifier and group, respectively. These values may differ from system to system. Type in the following command to get your media user’s PUID and GUID:
id media
uid=1001(media) gid=1001(media) groups=1001(media),999(docker)
In this example, uid is equivalent to PUID and gid equivalent to PGID.
- PATH_MEDIA : this is the absolute path of the parent folder of the /data/torrents, /data/movies, /data/music, and /data/tv folders where your media would be stored. If you choose another path, make sure the media user has the read and write permissions to the specified directory.
The choice to specify a directory by media type will be very useful for the management of libraries within Plex. We’ll see later how to automatically set up moving a media file to the right directory once the download is complete.
-
-
Create the /home/media/docker-compose.yml file with the following content (do not change anything):
version: '3.7' services: deluge: image: linuxserver/deluge:latest container_name: deluge restart: unless-stopped network_mode: "host" ports: - 8112:8112 environment: - PUID=${PUID} - PGID=${PGID} - TZ=Europe/Paris volumes: - /home/media/deluge/config:/config - ${PATH_MEDIA}:/downloads -
Start the deluge container:
docker-compose up -d
4.2 – Sonarr, Radarr, Lidarr, Jackett et Plex
Each of the tools used is optional. If you don’t want to use any of them, you can exclude it from the docker-compose.yml file.
-
Edit the /home/media/docker-compose.yml file and add the following lines after the Deluge container:
version: '3.7' services: deluge: [ ... ] - ${PATH_MEDIA}:/downloads jackett: image: linuxserver/jackett:latest container_name: jackett restart: unless-stopped network_mode: "host" ports: - 9117:9117 environment: - PUID=${PUID} - PGID=${PGID} - TZ=Europe/Paris volumes: - /home/media/jackett/config:/config - /etc/localtime:/etc/localtime:ro sonarr: image: linuxserver/sonarr:latest container_name: sonarr restart: unless-stopped network_mode: "host" ports: - 8989:8989 environment: - PUID=${PUID} - PGID=${PGID} - TZ=Europe/Paris volumes: - /home/media/sonarr/config:/config - ${PATH_MEDIA}:/data radarr: image: linuxserver/radarr:latest container_name: radarr restart: unless-stopped network_mode: "host" ports: - 7878:7878 environment: - PUID=${PUID} - PGID=${PGID} - TZ=Europe/Paris volumes: - /home/media/radarr/config:/config - ${PATH_MEDIA}:/data lidarr: image: linuxserver/lidarr:latest container_name: lidarr restart: unless-stopped network_mode: "host" ports: - 8686:8686 environment: - PUID=${PUID} - PGID=${PGID} - TZ=Europe/Paris volumes: - /home/media/lidarr/config:/config - ${PATH_MEDIA}:/data plex: image: linuxserver/plex:latest container_name: plex restart: unless-stopped network_mode: "host" ports: - 32400:32400 environment: - VERSION=latest - PUID=${PUID} - PGID=${PGID} - TZ=Europe/Paris volumes: - /home/media/config:/config - ${PATH_MEDIA}:/data -
Start all your containers:
docker-compose up -d
-
Please note, docker is a process launched as root. This means that the configuration files created when your containers start up have owner and group root. To avoid future permissions issues, the media user must be able to read and write to these configuration files.
Return to your superuser and assign the configuration files to the media user:
exit
sudo chown -R media:media /home/media
4.3 – Automatic Docker Image Update
To take advantage of the latest features (Plex codecs, updated Jackett tracker URLs, etc.) and the latest security patches, it is important to have updated Docker images.
If you have several docker-compose.yml on your system, you should check out this article.
We will automate the updating of images with a crontab rule. This will be scheduled for execution every day at 11:42pm. Traces of the execution of these commands will be recorded in a file /var/log/docker-updater.log.
-
Edit the crontab:
sudo crontab -e
-
Add the following line:
42 23 * * * (cd /home/media && /usr/local/bin/docker-compose pull && /usr/local/bin/docker-compose up -d --remove-orphans && /usr/bin/docker image prune -f) > /var/log/docker-updater.log 2>&1
-
Save and exit.
5 – (Optional) Remote access
-
If you want to remain full Docker and access your services via a URL such as https://deluge.mondomaine.com for example, I recommend using Traefik:
Choice 1 : Remote access with Traefik -
If you already have an Nginx server (or if you are more comfortable with Nginx) and wish to access your services via a URL such as https://mondomaine.com/deluge for example, I recommend using Nginx :
Choice 2 : Remote access Nginx
6 – Configuration and issues
We will now configure the applications so they can communicate with each other and make sure each of them has at least minimum security:
Configuration and issues
Ubuntu Server 20.04Docker 19.03.8
Docker Compose 1.25.5
Deluge 2.0.4
Jackett 0.16.105.0
Sonarr 2.0.0.5344
Radarr 0.2.0.1480
Lidarr 0.7.1.1381


Leave a Reply
Want to join the discussion?Feel free to contribute!